How to Get Free SSL Certificate from Inmotion Hosting
One of the somewhat recent developments on the web is that Google is starting to prefer content that is secured with an SSL certificate. It started in 2014 with an announcement by Google and it has been getting coverage by most SEO authorities for a while, like here, here and here.
Now, 3 years later, 2017 has been deemed the year of SSL, and it even seems that maybe it will be required for some sites. Heck, Moz shows that at least half of first page results are served via https.
SSL is no longer for Ecommerce and geeks only
It used to be that you really only needed SSL if you were collecting or providing sensitive information. Personal, financial or healthcare data. But due to problems with phishing, spoofing, and the growing number of vulnerabilities, it makes sense that all websites should be "verified" through an SSL certificate.
Until the past couple of years, SSL was really only an option that bloggers would consider if they were making money because it was an added cost to hosting, domain registration and any other paid service they needed like Vimeo, or Aweber and similar.


There was also a technical challenge with setting up an SSL certificate in a shared hosting environment. I won't get into the details of it but it's a bit of a challenge to make a certificate work when there are shared accounts under one IP address --the way that most shared hosting works.
SSL is now free... mostly
But recently a few companies have surfaced that provide free SSL certificates, and they take care of the technical issues regarding multiple websites under one IP address and one server.
For the free SSL certificates offered by these companies to work, your host has to support their process. Both of my preferred hosting companies did not support this fully, until recently. Greengeeks and Inmotion required that you have a dedicated IP and at least a virtual server in order to install an SSL certificate, and you had to purchase it from them or from a 3rd party.
But to my delight and yours, Inmotion has just enabled the use of free SSL certificates in all of their service plans.

Quick guide on how to set up free SSL for your Inmotion hosting
If you have a shared hosting account, you'll find detailed instructions on how to setup the SSL certificate here. If you have a VPS account then you'll need to follow this guide instead.
In the process of doing this for my own VPS, I only had an issue with the guide because I had forgotten how to login to WHM as the root user. I tend to use SSH and I have that setup without the need for a password. But I was able to look up my password on LastPass and a few moments later, I was logged in.
To login as the root user, you need to go to the WHM address for your server directly and enter the root username and password. The URL for your WHM panel should be something like this: https://serverid.inmotionhosting.com:2087.
If you have any trouble with this, just open up a support chat with them and they'll help you right away. After I enabled auto SSL in my account, it took about 30 minutes for the SSL certificates to be ready.

I was expecting the process to be more complicated than this, but it wasn't. The next step was to activate the certificate on my WordPress blog, here at Notagrouch.com.
To "turn on" the certificate for WordPress, I used a popular plugin that takes care of most of it. The plugin is Really Simple SSL. If you want to follow my steps, then install and activate the plugin (instructions here).
Once the plugin is active, go to the Settings area in your WordPress dashboard and click on SSL. Then click on enable SSL.
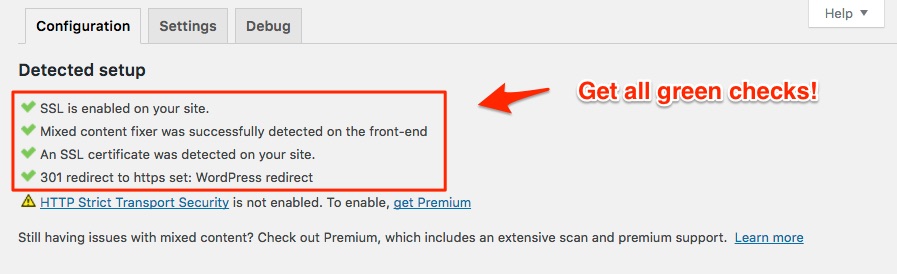
Your settings screen should look like this afterwards:
The settings tab in the configuration screen also has a few options. Ideally, you should make the plugin work by using the htaccess configuration instead of the WordPress or Javascript options.
If everything works fine, you may want to try switching to using htaccess for a slight performance boost.
Once everything is installed and configured, you may get kicked out of the WordPress dashboard. This is expected, and you just need to log back in. Notice that when you log back in, you'll be accessing your site via "https" instead of regular "http."
To verify the plugin is working, just visit any page on your blog and look to make sure your browser shows that the connection is secure and the protocol (the part before the URL) says https.
Conclusion
Inmotion introduced free SSL for all plans. It's easy to install, follow the instructions for shared hosting accounts or VPS accounts. You can then use a plugin to activate the SSL on your WordPress website. Voila!